Showing posts with label Snow Angel. Show all posts

Thursday, June 28, 2012

"Winter Wishes" in June

Hi everyone! I hope you are all having a wonderful week! It is my turn again to be a featured design team member at Getting Cricky, along with my fabulously talented DT sister, Heather from Heather's Crafty Blog Space. Today we are featuring the "Winter Wishes" stamp set from K Andrew Designs....

K Andrew Designs
To purchase this set, simply click on the preview above.


Today I am featuring 2 of my previous projects....

To see my original post with all the details, click HERE


To see my original post with all the details, click HERE


Thank you very much for stopping by today!


Saturday, December 31, 2011

Christmas Card Grand Finale

Happy almost new year! I was so busy making Christmas cards & doing family stuff that I never got around to posting anything. So.... these are some of my Christmas cards I sent out....

I have a real problem with mass producing cuz I want everyone's card to be unique. The drawback is it takes me sooooo much time, lol. But the good thing is I'm very fortunate to have lots of time to craft.

I managed to crank out 35 original designs. I sent our photo card to 60 people, which was my original goal of sending a handmade card with each photo card (you can see the photo I'm referring to on my last post). However, I think I should have started in September in order to accomplish that feat!

Anyway.... I will post each card with its description underneath....


The card base is white cardstock from WalMart & it measures 4 x 5". All of the paper was printed & cut with my Cricut Imagine machine, from the "Snow Angel" cartridge. The tree is cut at 3". I used my Cuttlebug "Swiss Dots" folder to emboss the brown layer. I used a Viva Decor Pearl Pen in "ice white" to make the little pearls. The rhinestone star is from my stash & the corners were chomped with my Fiskars corner rounder (small).


This card base is white cardstock from WalMart & it measures 4 x 5". All the patterned paper is from the DCWV "Homemade Christmas" stack. The tree was cut at 3.5" with my Cricut Expression machine, from the "Joys of the Season" cartridge. I also used some Stickles in "Candy Cane" for the outlines & dots. The twine is "Maraschino" from The Twinery.


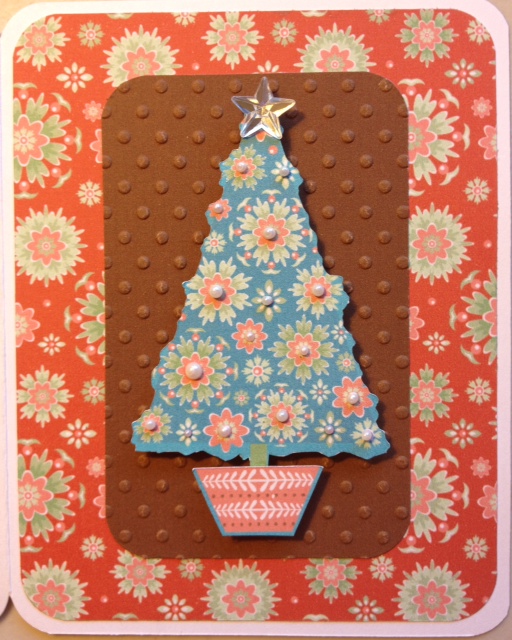
The base of this card is white cardstock from WalMart & it measures 4 x 5". The rest of the card was done on my Cricut Imagine machine with the "Snow Angel" cartridge. The silver snowflake in the center is a brad from my stash. The scalloped corners were done with a Fiskars corner punch & the twine is "Honeydew" from The Twinery. I outlined & accented with "Cotton Candy" Stickles & a Pearl Pen in "ice white".


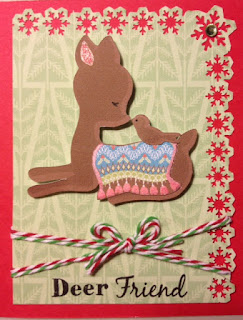
This card base is made with red Coredinations cardstock, size 4 x 5". The background layer & the deer/bird image are printed from my Imagine "Snow Angel" cartridge & the background layer is punched with a Martha Stewart punch. The twine is from The Twinery. The stamped sentiment is 2 seperate word stamps, both from the K Andrew Designs "Winter Wishes" stamp set. Her stamps are truly awesome & her sets have so many mix & match options it's almost endless!

Well.... I think that's a pretty good sampling of the cards I did this Christmas. I hope you enjoyed them & thanks for stopping by!

HAPPY NEW YEAR!!!!!

Sunday, November 13, 2011

Imagine Paper Sample Ring Thing-y

Howdy! So the iPhone is here, activated & ready to rock! It's definately gonna take some getting used to but I think it's gonna be more awesome than I can imagine. Speaking of imagine (oohhh.... check out that segway huh?) Today I'm displaying this Imagine paper sample ring I made. I actually lifted this idea from Robyn at My Pink Stamper but I thought I'd show you how mine looks completed. You can check out her video of this project HERE. So here we go!....

This is what it looks like all put together....

I used this snap ring thingy, which you cannot find at WalMart (Robyn mentions getting them at WalMart in her video), at least not at the WalMart in Windsor, CA. I ended up getting these at Beverly's & they're made by 7 Gypsies. I got a pack of 10 for like $7 I think.  

All I did was print out all the patterned paper on each Imagine cartridge I have. They all have 20 patterns per cartridge. I just selected the square shape from the pre-loaded images on my Imagine, set at 2" & popped in each pattern. It's a little time consuming but soooo worth it! At the 2" size all 20 patterns on the cart will fit easily on one page. I wrote the name of the cartridge on the back of each square (you could use computer labels if you want). Then I punched a 1/4" hole in all of them, put them on the ring & voila!! I organized mine by color within each cart but you can obviously do it however you want.

I was a bit skeptical on whether or not this would really help me but it has already helped me so much! I don't have to flip thru the books to coordinate my paper patterns. Plus it makes it super easy to coordinate patterns from different cartridges.

I hope you enjoyed my little OCD project! Lol....