Saturday, December 31, 2011

Christmas Card Grand Finale

Happy almost new year! I was so busy making Christmas cards & doing family stuff that I never got around to posting anything. So.... these are some of my Christmas cards I sent out....

I have a real problem with mass producing cuz I want everyone's card to be unique. The drawback is it takes me sooooo much time, lol. But the good thing is I'm very fortunate to have lots of time to craft.

I managed to crank out 35 original designs. I sent our photo card to 60 people, which was my original goal of sending a handmade card with each photo card (you can see the photo I'm referring to on my last post). However, I think I should have started in September in order to accomplish that feat!

Anyway.... I will post each card with its description underneath....


The card base is white cardstock from WalMart & it measures 4 x 5". All of the paper was printed & cut with my Cricut Imagine machine, from the "Snow Angel" cartridge. The tree is cut at 3". I used my Cuttlebug "Swiss Dots" folder to emboss the brown layer. I used a Viva Decor Pearl Pen in "ice white" to make the little pearls. The rhinestone star is from my stash & the corners were chomped with my Fiskars corner rounder (small).


This card base is white cardstock from WalMart & it measures 4 x 5". All the patterned paper is from the DCWV "Homemade Christmas" stack. The tree was cut at 3.5" with my Cricut Expression machine, from the "Joys of the Season" cartridge. I also used some Stickles in "Candy Cane" for the outlines & dots. The twine is "Maraschino" from The Twinery.


The base of this card is white cardstock from WalMart & it measures 4 x 5". The rest of the card was done on my Cricut Imagine machine with the "Snow Angel" cartridge. The silver snowflake in the center is a brad from my stash. The scalloped corners were done with a Fiskars corner punch & the twine is "Honeydew" from The Twinery. I outlined & accented with "Cotton Candy" Stickles & a Pearl Pen in "ice white".
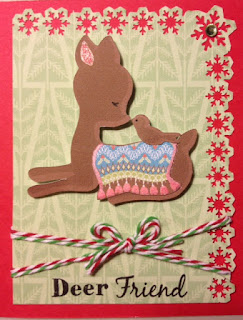


This card base is made with red Coredinations cardstock, size 4 x 5". The background layer & the deer/bird image are printed from my Imagine "Snow Angel" cartridge & the background layer is punched with a Martha Stewart punch. The twine is from The Twinery. The stamped sentiment is 2 seperate word stamps, both from the K Andrew Designs "Winter Wishes" stamp set. Her stamps are truly awesome & her sets have so many mix & match options it's almost endless!

Well.... I think that's a pretty good sampling of the cards I did this Christmas. I hope you enjoyed them & thanks for stopping by!

HAPPY NEW YEAR!!!!!

Thursday, December 15, 2011

Happy Howl-idays!

Hi friends! I just thought I would share our Christmas card photo with you guys. My poor babies were not very happy about it (except Hugo, who seems to enjoy workin' it for the camera)! Every year I make them dress up & wear antlers or some silly thing but they are always good little troopers & tolerate the torture (barely)!......

Haylee (3), Hugo (5) & Lexi (11)


Tuesday, December 13, 2011

Quick Altered Comp Book

Howdy! I just threw this together for my friend's birthday & thought I would do a quick post & share it. This was really easy & took me about 20 minutes to do....


The color really doesn't represent well here as it is actually a brighter pink in person. I used a standard 7 x 9.75" comp book & covered it with a patterned paper from the DCWV "Madly in Love" stack. The ribbon on the edge is from my stash. I did her name using my Gypsy, the internal cartridge "Gypsy Font" & the welding feature. I also covered the back with a coordinating pattern from the same stack....


That's it! Super easy peasy! Thanks for stopping by!
                                                    

Sunday, December 11, 2011

A Christmas Card....

Hallelujah!! I finally figured out how to get bigger pictures on here!! There was an issue with my browser apparently, but thanks to those of you who sent me their suggestions!

This is a card I did earlier today when I couldn't decide which image I wanted to use next (anyone else suffer from this problem??) The result? A very busy card! I know this particular reindeer is a very popular image but I just love him so much that I have to use him at least once every Christmas....

 
This card is 4-3/4" square (don't ask about the weird size - I had some issues, lol). The background papers are from the DCWV "Merry Christmas Stack" & the background scalloped image is from the "Songbird" cartridge (p.61) & was cut with my Cricut Expression machine. All the other images were printed & cut with my Cricut Imagine machine. The reindeer is from the "Create A Critter" cartridge & is cut at 2-1/2". The tree is from the "Winter Frolic" cartridge & is cut at 3". The lights are also from "Create A Critter" & are cut at 1-1/2". I used several different colors of Stickles & some Glossy Accents for the antlers, hooves & spots.

Well.... I think that's it for today! I'll be posting more cards & projects throughout the week...
And, of course, a continued happy holidays to everyone!

Wednesday, December 7, 2011

Christmas Name Tags

Hello!! I hope everyone is having an awesome Wednesday! It's a beautiful day here in my little corner of the world...

I know I just did a post on name tags a couple weeks ago but people keep asking me to make them & I keep crankin em out! This pic is of some of the ones I did for a friend to tie onto her family's Xmas stockings. I did 12 of them total but you get the idea from looking at these 4....

By the way, that reminds me.... does anyone out there know how to make iPhone photos bigger on a Blogger post? If I try to make it any larger than "original size" it gets really distorted.... If anyone has any wisdom on this subject I would really appreciate some feedback! Thanks! ....


These were all done with the Cricut "Speaking of Winter" cartridge, using the base & layer features, cut at 2". All the lettering was printed & cut on my Cricut Imagine machine & the tags are from the Cricut "Plantin Schoolbook" cartridge & cut with my Cricut Expression machine (and Gypsy of course!) from heavy white shimmer cardstock. The tags were cut at 3" in height with lengths varying from 7-8". I used some Stickles in "Diamond" & the ribbon is from Celebrate It (by Michaels). Finally, the edges were inked with Studio G ink in bright red & deep green.

Thanks for stopping by & have a great rest of the week!!

Sunday, December 4, 2011

Happy Birthday Chick!

Hello my peeps! I hope everyone is surviving yet another holiday season.  We are just trying to keep everything grounded here at the ranch during these horrible wind storms! I seriously think I saw a chicken blow by me yesterday, he he he. All I can say is thank God Vinny cut back the GIANT Valley Oak tree that was literally hanging over our house!

Anyway, this is a card I made for a friend's birthday the other day. . . . .


This card was actually super easy & quick! I held off on getting a Cricut Imagine machine for so long because I thought it took away so much of our creativity. However, I find that it is an awesome supplement to my Cricut Expression because sometimes you just need a quick card & don't have time to pick out all the different papers (which is exactly what happened in this case).

This is a combination of 2 different images on the Imagine More Cards cartridge. The card base is from the 1st layer of the image on p.25 & the rest is from the images on p.10. The card base is cut at 4-1/4" & the other images are cut accordingly. The twine is "Cappucino" from The Twinery.

Thanks for stopping by!. . . . .