Wednesday, February 29, 2012

My 1st Award Ever!!

OMG! OMG! I'm so excited because my cat & dog card from my 2/23/12 post is "showcased" HERE at the Die Cuttin Diva's blog. This was challenge #53 - favorite pet. This was literally one of my very first challenges so I'm beyond happy about being recognized! There were so many amazing projects! I just want to say thank you so much to the ladies at Die Cuttin Diva for choosing my card to showcase! So.... thank you! thank you! thank you!


If you haven't checked out the Die Cuttin Diva blog you should check it out! There is a new challenge posted if you want to participate....It's so much fun!!

Sunday, February 26, 2012

Purple-licious

Hi there! I hope you all had a fab weekend! We had a good one - except for yesterday morning 3 of our dogs got ahold of one of our feral (wild) cats & tore him up pretty badly. His jaw is fractured & he has several large puncture wounds. He's home from the vet's now so we have a temporary cat ICU in my husband's office bathroom, lol. Hopefully he'll recover - poor little guy!

Anyway, I really wanted to enter a couple of challenges but with all the cat/dog drama I couldn't get my project finished in time to link up. However, I decided to carry out the challenges anyway, just for the experience & fun. The first challenge was over at DL Art & it was to use only the color purple & one other color. The other challenge was over at    K Andrew's blog & the theme was to do a wedding or engagement project. I was able to combine the 2 challenges into one card, which I had a blast making!....

I am entering this card into the following current challenges:

Fantabulous Cricut Challenge Blog -  "Challenge Me Monday", theme is "Fancy Trims", use fabric or lace

Creative Cutter Room -  "Design Time Thursday", shape card (no squares or rectangles)


I used my Cricut Expression & Gypsy for this project. The card base is from the "Sentimentals" cartridge, cut at 5.25". All of the paper/cardstock I used is from my stash of loose papers, although I think most of it is Bazzill. The main image is from the "Damask Decor" cartridge, cut at 4". I used pop-dots for the main image on top of the twine & also for the birds by themselves.

The twine is "lilac" from The Twinery. The button, fabric flower, brad, eyelet, pearls & rhinestones are from my stash. The tiny lavender dots are from a Viva Decor Paper-Pen in "lilac". I used Stickles in "Star Dust" to outline the birds & on the tips of the fabric flower & "Lavender" on the eyelet & the heart brad.

All of the stamps on the outside & inside are by K Andrew Designs. I love love love her stamps! They are super high quality and the mix & match options are virtually endless! They are definitely a fabulous deal for the price & worth every penny. I used combinations from 2 sets: "Owly Hoo Sentiments" & "Winter Wishes". The little swirly flourishes on the inside are on the "Winter Wishes" set as well.

Well folks... I think that's all for today. Thank you so much for stopping by & taking the time to view my blog. I really appreciate all the super sweet comments too! See you real soon....

Thursday, February 23, 2012

Love is a Four-Legged Word

Hello there! For those of you who don't know, I change my blog's theme according to the nearest holiday, hence my new St. Patty's Day motif  :)  Anyhoo, I'm really excited because I'm entering today's card in several challenges. I have only participated in 3 challenges before so I'm kinda nervous! Isn't that silly?! I couldn't help myself because my favorite theme is pets, dogs specifically & there are so many challenges with a pet theme right now! This is really a reach for me because I'm really shy & unsure of myself in this whole crafting/blogging world. There are sooo many talented crafters out there - it's very intimidating to me for some reason. I know I shouldn't feel that way - everyone I've chatted with so far has been super nice & encouraging, so I guess it's just in my head, lol. Well, I figure the best way to overcome any fear is to jump in & give it my best! Sooo (deep breath) here I go!...

I'm entering this card in the following challenges:

Paper Playtime - "Say it with Sentiments", theme is pets & a sentiment

Scrappy Moms - "Terrific Tuesday Challenge", theme is "Tag - you're it!"

Die Cuttin Divas -  Favorite pet

Crafty Ribbons -  "Paws for Thought", ribbon(s) required

Cardz TV -  "A Stitch in Time", use real or faux stitching


And here is my card....


First of all, I was almost done with this card when I noticed the major contradiction. Can you tell what it is? Yes, I used a 2-legged half-dog to go with the "Love is a Four-legged word" sentiment. I had to laugh at myself when I realized it! I really didn't want to change it & I figured it would just give the card more character & get a few giggles. Sometimes the most obvious things just seem to slip by me!...so I'm very used to laughing at myself!

Now on to the details....The card base is Kraft cardstock cut at 5" square from the Cricut "Art Philosophy" cartridge on my Cricut Expression. The rest of this card was made using my Cricut Imagine machine. All of the papers on this card are from the "Best Friends" Imagine cartridge, as well as the dog & cat images (which are mounted using pop-dots). I am currently obsessed with making my own double-sided paper & I just love incorporating the corner folds to show it off.

The paw print punch is from EK Success & the paw/bone embossing folder I actually have no idea who made it, lol. I bought it on eBay & it didn't say who made it in the description & it came without any packaging or sleeve or anything. It's my mystery folder! The bone brad & the 3D paw print are from my stash. The paw print ribbon is by Offray. I'm usually thoroughly annoyed by those little score marks the Cricuts put on a card feature, but this time I used them to thread my ribbon through. They're still annoying but slightly less now, lol. I used Stickles in "Diamond" & "Xmas red" to add a little bling to their collars. The little tag I cut by hand. The faux stitching around the perimeter is done with a Micron05 pen in brown.

The sentiment stamp is from the Scrappy Moms Stamps set called "Raining Cats & Dogs" I love love love her stamps & this is my absolute favorite set! I stamped it with Tim Holtz Distress Ink in "Walnut Stain".
                             

Phew! I think that's it! Thank you so much for stopping by & have a fabulous day!

Sunday, February 19, 2012

My Super Hero

Hi again! I don't want to jinx myself but I think I fixed the problem of some of you not being able to see my pics. If you still can't see them, please let me know (so I can set my computer on fire, lol).

Anyway I hope you all had a nice V-day! The hubs & I just chilled at home with the dogs & had dinner, then he was asleep by 9:00 (sigh), lol. He gets me with the same joke on every holiday/bithday, which is "can you make me a real nice card to give to you?" Ha ha ha. So, I've just decided that what he really means is I should go buy myself some more supplies. That sounds logical right? lol.

Anyway, here is the V-day card I made for him.....


First off, the SV stands for Super Vinny (that's his name but no - he's not Italian at all, lol). I used my Gypsy & Imagine for this project, which I finally successfully downloaded the Imagine app! OMG! this is so cool I can't even stand it!!

This is a 5 x 7" card & the base is Kraft cardstock. The bird image & the wording are from the "3 Birds on Parade" Cricut cartridge. The "you're" above the sentiment is from a K Andrew Designs stamp set called "Owly Hoo", which I heat embossed. The background cloud paper is from a Debbie Mumm stack that doesn't have a name on it. The grassy hill is from the "Pop-Up Neighborhood" cart & the sun is from "Simply Charmed". I used Stickles in lime green, Black Diamond, Xmas red & Diamond, also some Glossy Accents on the sun & his beak. The little accent dots are from a Micron05 pen.

And that's all folks! I will be posting several new projects this week, including some challenge entries, if you want to stop back over & check them out. Thank you so much for visiting today! Have a great rest of your weekend!

Saturday, February 18, 2012

Grrrr....

Hi guys! I've been having problems with some people not being able to see my photos in my recent posts. I've been trying to find out why & I'm currently waiting for a response from the blogger tech dept. I have some really cool projects to post as soon as it's fixed....hopefully soon!!

In the meantime.... it seems to work fine if you go thru this link HERE

(this was posted for a challenge at My Pink Stamper & seems to work ok as a round-about way to access my blog).....please let me know if you CAN'T see it this way either.

Also, it seems to work more frequently anyway if you use MOZILLA FIREFOX as your browser

Thanks!!

Monday, February 13, 2012

My Pink Stamper February Blog Hop & Challenge

Hi there! I hope you are having a fabulous Monday! Today's post is for the My Pink Stamper February Blog Hop & Challenge. If you want to participate in the hop you can go HERE & start hopping thru all the wonderful design team projects. If you want to purchase My Pink Stamper stamps you can go HERE & choose from her retailers.

The rules for this challenge are:
*Use the color RED, a circle, a pink ribbon & more than one My Pink Stamper stamp.

Here is my project....


The card base is Kraft cardstock, folded size 4 x 8". The white base layer is white cardstock from my stash, embossed with the Darice "Layered Hearts" embossing folder (it might be hard to see but this is where I fulfilled the "use a circle" requirement). The 3 hearts are cut from the Cricut "Art Philosophy" cartridge, size 3.5" for the middle heart & 3" for the other two. The "Art Philosophy" cartridge is only available thru a Close to My Heart consultant - you can click HERE to check out their website & find a consultant. The red paper is a linen paper from The Paper Company & the pink shimmer paper is from my stash. The pink ribbon in the background is from Offray.

The stamps are from My Pink Stamper, of course! You can check them out by clicking on the link above at the beginning of this post. All 3 sentiments are from the "Itty Bitty-licious" stamp set, which is currently my favorite MPS set.

Well, I guess that's it for today! I have some baby shower projects I'll be posting in the next couple days & I hope you'll come back & check them out. Thanks for stopping by today!

Thursday, February 2, 2012

Moo-chas Gracias

Whoo hoo! I discovered what my problem was & I won't bore you with the details but it had something to do with me having 2 gmail accounts. Anyway, I finished all the baby shower invitations & now I'm on to decorations & party favors. The shower is on Feb 12th so I have plenty of time but there are so many projects I want to do for it! I know, I know, I'm gonna have to choose which ones!

My mom offered to help me make a diaper cake (gulp!) but I still haven't decided if I'm brave enough to actually do it. I guess if I screw it up or can't do it I can just give her a giant bag or box of diapers! I know she'll appreciate them either way! I will be sharing all my projects as I go along over the next 12 days so please stop back by & check it out!

Before the baby madness sets in I had to do a thank you card for our former neighbor who had us over for dinner last week. She's 85 & still going strong! So here's the card I made, with the details below it.....

            
The card base is Kraft cardstock from my local JoAnn store. I cut it with my Cricut Expression & Gypsy using the "Art Philosophy" cartridge, at 5" using the card feature on pg. 34. If you want to purchase the Art Philosophy cartridge it is only available thru a Clost to my Heart consultant, which you can find by going to the CTMH website. This is totally a must-have cartridge! It comes in a bundle with a bunch of other awesome stuff so it's absolutely worth the $99!

Ok, moving on now.... The blue & green backgrounds were also from AP using the Base & Tag features on the same page as the card. Both papers were from my stash & the green was already pre-embossed. The cow image is from the "Pop-Up Neighborhood" cartridge, using the Accessory feature on pg. 54 & she's cut at 2.5". This was a Cricut circle exclusive cartridge & I really didn't care for the base images, but upon further investigation I discovered that it has the BEST Accessory feature ever!

Ok, moving on again (in case you didn't already notice I have a hard time focusing for more than 2 minutes at a time!)..... the tag is also from the AP cartridge, using the Base & Layer images on pg. 65. I used some Aleene's Paper Glaze on the red border. The sentiment is from My Pink Stamper's "Even More Punny-licious stamp set. I used "Black Diamond" Stickles on the nostrils & hooves, and of course some googley eyes. The twine is "Maraschino" from The Twinery.

Well, I think that's it! Now it's off to more baby shower projects!.... Thanks so much for stopping by!!

Wednesday, February 1, 2012

Blogger problems!!....

Hi everyone! I'm only able to write a short post because my Blogger won't save anything longer than about 10 lines. If I can't save it - I can't post it! So after re-doing the same new post 3 times I decided to take a break & try again tomorrow (actually I needed to take a break or I was gonna throw my computer out the window!). So I just wanted to let you know that I'm still here - I'm just having some issues right now. One way or another I'll be back soon with some really cute cards & projects!...

Wednesday, January 18, 2012

Baby Shower Invitations

Hello! I have taken a little break from blogging just because I've been so busy & had so many projects going on all at the same time. However, I thought I would take a few minutes & do a quick post of my major project of the moment......

My stepson & daughter-in-law are having a baby & she's due April 1st! We are having a big co-ed shower for them next month & I'm doing the invitations - 50 of them! I am the WORST mass producer ever! I normally put so much attention to detail into every card or project I make that it's very hard for me to do quick & simple, but I'm getting better at it now. Anyway, here are some pics of the invitations.... (I should mention that the baby is a boy & his name will be Fox, hence the fox on the invites)....


Here are the details....
The base is Bazzill cardstock in "Bitter Chocolate" cut at 5 x 7". I rounded the corners with my Fiskars corner rounder. I embossed the top & bottom, leaving the middle flat so that the blue paper would lay smoothly. I used my Cuttlebug machine & the "Seeing Spots" embossing folder. My daughter-in-law composed & printed the text on the light blue paper with her computer. I then cut them down to fit & edged the top & bottom with my Fiskars Paper Edgers scissors in the "Deckle" pattern. The fox is from the "Create-a-Critter" Cricut cartridge (size 2") & was printed & cut with my Cricut Imagine machine, then attached to the card with pop dots to give them some dimension. I added some Stickles in "Black Diamond" on each nose & a tiny bit of "Star Dust" on the tip of the tail.

Well.... I think that's it for today. I still have about 15 more to do so here I go! Thanks for visiting!

Sunday, January 1, 2012

YaYas Rule!

Hello & happy new year!! I hope you're out doing something fun tonight!! I, of course, am blogging. Lol. My husband fell asleep at 8:30 so it's just me & the dogs eating fancy cheese & having our own little celebration.

My mom has a group of women friends who have been friends for 40+ years. There are 5 of them including my mom. In 2002, when the movie "Divine Secrets of the YaYa Sisterhood" came out, they began referring to their group as "The YaYas". As they do every year between Christmas & New Years the ladies hosted a party for all of their families. There are now about 30 of us in this big family. In honor of this event I made a banner & some party favors for them.....


For this banner I used the Cricut Art Philosophy cartridge, which I just got for Christmas from my mom! It comes in a bundle for $99 with a bunch of other stuff including 3 stamp sets & these stamps are the best I've ever used in terms of clarity & crispness. You can only order this bundle from a Close to my Heart rep so HERE is the link to do so. I can already tell I will be using this cartridge all the time! Anyway.... the letters were also cut from this cartridge. All of the papers came from the K&Company "Classic K Bailey" and " "McKenna" stacks. The twine is "Honeydew" & "Cappucino" from The Twinery. I used some Stickles for a little bling on some of the letters, using colors "Diamond", "Cotton Candy" & "Stardust".

Now..... on to the party favors.....


I originally got this idea from two different blogs: My Pink Stamper & Pink Cricut. For the candies I used Hershey's Nuggets, which already have gold foil wrappers on them. I used papers from the same K&Company stacks mentioned above & either cut out the shapes with my Expression or used an edge punch. The candies are wrapped with 1 x 3" strips of paper. All of the stamps are "My Acrilix" from Close to my Heart (see above for link). Once again, I must say I love love love these stamps!!! To hold it all together I used little cello bags from my local Michaels store & a stapler. I am definitely using this idea again for my daughter-in-law's baby shower next month (yes, I'm going to be a Grandma!).

Phew!! That was a long one! I hope you enjoyed these projects & thanks so much for taking the time to look! Happy new year!!

Saturday, December 31, 2011

Christmas Card Grand Finale

Happy almost new year! I was so busy making Christmas cards & doing family stuff that I never got around to posting anything. So.... these are some of my Christmas cards I sent out....

I have a real problem with mass producing cuz I want everyone's card to be unique. The drawback is it takes me sooooo much time, lol. But the good thing is I'm very fortunate to have lots of time to craft.

I managed to crank out 35 original designs. I sent our photo card to 60 people, which was my original goal of sending a handmade card with each photo card (you can see the photo I'm referring to on my last post). However, I think I should have started in September in order to accomplish that feat!

Anyway.... I will post each card with its description underneath....


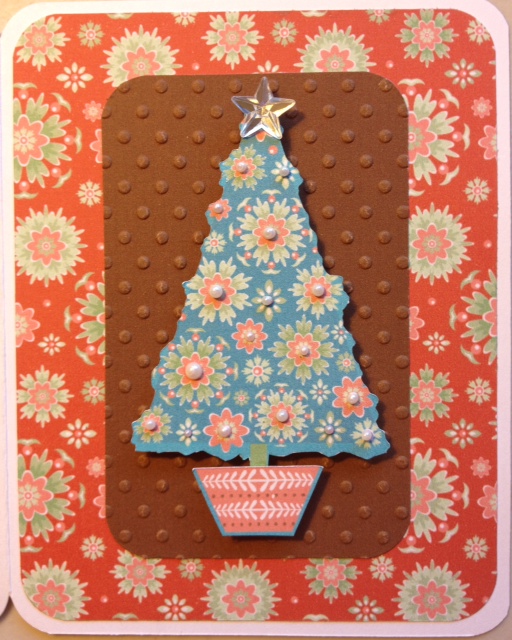
The card base is white cardstock from WalMart & it measures 4 x 5". All of the paper was printed & cut with my Cricut Imagine machine, from the "Snow Angel" cartridge. The tree is cut at 3". I used my Cuttlebug "Swiss Dots" folder to emboss the brown layer. I used a Viva Decor Pearl Pen in "ice white" to make the little pearls. The rhinestone star is from my stash & the corners were chomped with my Fiskars corner rounder (small).


This card base is white cardstock from WalMart & it measures 4 x 5". All the patterned paper is from the DCWV "Homemade Christmas" stack. The tree was cut at 3.5" with my Cricut Expression machine, from the "Joys of the Season" cartridge. I also used some Stickles in "Candy Cane" for the outlines & dots. The twine is "Maraschino" from The Twinery.


The base of this card is white cardstock from WalMart & it measures 4 x 5". The rest of the card was done on my Cricut Imagine machine with the "Snow Angel" cartridge. The silver snowflake in the center is a brad from my stash. The scalloped corners were done with a Fiskars corner punch & the twine is "Honeydew" from The Twinery. I outlined & accented with "Cotton Candy" Stickles & a Pearl Pen in "ice white".


This card base is made with red Coredinations cardstock, size 4 x 5". The background layer & the deer/bird image are printed from my Imagine "Snow Angel" cartridge & the background layer is punched with a Martha Stewart punch. The twine is from The Twinery. The stamped sentiment is 2 seperate word stamps, both from the K Andrew Designs "Winter Wishes" stamp set. Her stamps are truly awesome & her sets have so many mix & match options it's almost endless!

Well.... I think that's a pretty good sampling of the cards I did this Christmas. I hope you enjoyed them & thanks for stopping by!

HAPPY NEW YEAR!!!!!

Thursday, December 15, 2011

Happy Howl-idays!

Hi friends! I just thought I would share our Christmas card photo with you guys. My poor babies were not very happy about it (except Hugo, who seems to enjoy workin' it for the camera)! Every year I make them dress up & wear antlers or some silly thing but they are always good little troopers & tolerate the torture (barely)!......

Haylee (3), Hugo (5) & Lexi (11)


Tuesday, December 13, 2011

Quick Altered Comp Book

Howdy! I just threw this together for my friend's birthday & thought I would do a quick post & share it. This was really easy & took me about 20 minutes to do....


The color really doesn't represent well here as it is actually a brighter pink in person. I used a standard 7 x 9.75" comp book & covered it with a patterned paper from the DCWV "Madly in Love" stack. The ribbon on the edge is from my stash. I did her name using my Gypsy, the internal cartridge "Gypsy Font" & the welding feature. I also covered the back with a coordinating pattern from the same stack....


That's it! Super easy peasy! Thanks for stopping by!
                                                    

Sunday, December 11, 2011

A Christmas Card....

Hallelujah!! I finally figured out how to get bigger pictures on here!! There was an issue with my browser apparently, but thanks to those of you who sent me their suggestions!

This is a card I did earlier today when I couldn't decide which image I wanted to use next (anyone else suffer from this problem??) The result? A very busy card! I know this particular reindeer is a very popular image but I just love him so much that I have to use him at least once every Christmas....

 
This card is 4-3/4" square (don't ask about the weird size - I had some issues, lol). The background papers are from the DCWV "Merry Christmas Stack" & the background scalloped image is from the "Songbird" cartridge (p.61) & was cut with my Cricut Expression machine. All the other images were printed & cut with my Cricut Imagine machine. The reindeer is from the "Create A Critter" cartridge & is cut at 2-1/2". The tree is from the "Winter Frolic" cartridge & is cut at 3". The lights are also from "Create A Critter" & are cut at 1-1/2". I used several different colors of Stickles & some Glossy Accents for the antlers, hooves & spots.

Well.... I think that's it for today! I'll be posting more cards & projects throughout the week...
And, of course, a continued happy holidays to everyone!

Wednesday, December 7, 2011

Christmas Name Tags

Hello!! I hope everyone is having an awesome Wednesday! It's a beautiful day here in my little corner of the world...

I know I just did a post on name tags a couple weeks ago but people keep asking me to make them & I keep crankin em out! This pic is of some of the ones I did for a friend to tie onto her family's Xmas stockings. I did 12 of them total but you get the idea from looking at these 4....

By the way, that reminds me.... does anyone out there know how to make iPhone photos bigger on a Blogger post? If I try to make it any larger than "original size" it gets really distorted.... If anyone has any wisdom on this subject I would really appreciate some feedback! Thanks! ....


These were all done with the Cricut "Speaking of Winter" cartridge, using the base & layer features, cut at 2". All the lettering was printed & cut on my Cricut Imagine machine & the tags are from the Cricut "Plantin Schoolbook" cartridge & cut with my Cricut Expression machine (and Gypsy of course!) from heavy white shimmer cardstock. The tags were cut at 3" in height with lengths varying from 7-8". I used some Stickles in "Diamond" & the ribbon is from Celebrate It (by Michaels). Finally, the edges were inked with Studio G ink in bright red & deep green.

Thanks for stopping by & have a great rest of the week!!

Sunday, December 4, 2011

Happy Birthday Chick!

Hello my peeps! I hope everyone is surviving yet another holiday season.  We are just trying to keep everything grounded here at the ranch during these horrible wind storms! I seriously think I saw a chicken blow by me yesterday, he he he. All I can say is thank God Vinny cut back the GIANT Valley Oak tree that was literally hanging over our house!

Anyway, this is a card I made for a friend's birthday the other day. . . . .


This card was actually super easy & quick! I held off on getting a Cricut Imagine machine for so long because I thought it took away so much of our creativity. However, I find that it is an awesome supplement to my Cricut Expression because sometimes you just need a quick card & don't have time to pick out all the different papers (which is exactly what happened in this case).

This is a combination of 2 different images on the Imagine More Cards cartridge. The card base is from the 1st layer of the image on p.25 & the rest is from the images on p.10. The card base is cut at 4-1/4" & the other images are cut accordingly. The twine is "Cappucino" from The Twinery.

Thanks for stopping by!. . . . .

Monday, November 28, 2011

More Llama Drama....

Hello again! I just realized I never followed up about our poor lonely llama, Lily. Well . . . about 2 weeks ago we finally got her a new friend! This is Dahli . . . .


And here is a video of her first meeting with Lily (the white one), who is acting like a stuck up b-word in this clip but she's slowly getting used to her new friend . . . .


Have a great day!!

Sunday, November 27, 2011

I'm baaack!! (with name tags)

Hello everyone! I have not blogged in almost 2 weeks so I'm gettin back on the proverbial horse today. I've been super busy, as I'm sure everyone is this time of year. On top of that our internet was out this whole past week. There are very few drawbacks to living in the boonies but the biggest one would have to be our internet situation (followed closely by mountain lions). We're not on satellite anymore - thank God! but this new internet provider we have consists of 3 guys & a tiny office. So when our internet goes out over the long holiday weekend there's no one answering the phones till Monday. Luckily it just miraculously came on about 3 hours ago. I was totally freakin out! I mean tomorrow is Cyber Monday for Pete's sake! And this chick is all about the online shopping! I haven't been in a mall in years & I will do everything within my power to keep it that way.

Plus......I'm a huge QVC & HSN junkie. I have one or the other streaming live on my laptop pretty much every waking hour. Oh yeah.... and I also have a little eBay addiction problem. The hubster has to cut me off occasionally when I get out of control, lol. But now I'm rambling so on to the project we go!.....

Some family friends of ours asked me to make these name tags to put on the front of their shoe baskets in their mud room (very Pottery Barn-esque I know). They still need to be mounted to a wood background but that's Vinny's department! Once they're mounted to the wood we will (he will) drill 2 holes in the top so we can use a ribbon or wire to attach them to the baskets. I love doing personalized stuff like this for people! It's so much fun figuring out a color scheme, size, font, etc. And it gives me a chance to reflect their individual personalities a little bit. So..... here are the pics......
Here is a quick summary of the elements I used:  all paper from DCWV & ColorbokCricut cartridges: Songbird, Gypsy Font, Feeling Groovy, Cuttin Up & Calligraphy. I used Aleene's Paper Glaze to give the names some dimension. The size of each tag is 6-1/4 x 3".

Thanks for visiting me & have a fabulous week!

Sunday, November 13, 2011

Imagine Paper Sample Ring Thing-y

Howdy! So the iPhone is here, activated & ready to rock! It's definately gonna take some getting used to but I think it's gonna be more awesome than I can imagine. Speaking of imagine (oohhh.... check out that segway huh?) Today I'm displaying this Imagine paper sample ring I made. I actually lifted this idea from Robyn at My Pink Stamper but I thought I'd show you how mine looks completed. You can check out her video of this project HERE. So here we go!....

This is what it looks like all put together....

I used this snap ring thingy, which you cannot find at WalMart (Robyn mentions getting them at WalMart in her video), at least not at the WalMart in Windsor, CA. I ended up getting these at Beverly's & they're made by 7 Gypsies. I got a pack of 10 for like $7 I think.  

All I did was print out all the patterned paper on each Imagine cartridge I have. They all have 20 patterns per cartridge. I just selected the square shape from the pre-loaded images on my Imagine, set at 2" & popped in each pattern. It's a little time consuming but soooo worth it! At the 2" size all 20 patterns on the cart will fit easily on one page. I wrote the name of the cartridge on the back of each square (you could use computer labels if you want). Then I punched a 1/4" hole in all of them, put them on the ring & voila!! I organized mine by color within each cart but you can obviously do it however you want.

I was a bit skeptical on whether or not this would really help me but it has already helped me so much! I don't have to flip thru the books to coordinate my paper patterns. Plus it makes it super easy to coordinate patterns from different cartridges.

I hope you enjoyed my little OCD project! Lol....

Saturday, November 12, 2011

iPhone-tabulous!

Hello there! I have been holding off on posting anymore pics cuz I'm so tired of the crappy pics my Blackberry takes. However, the long awaited moment is finally here.... my iPhone 4s came today! Unfortunately we are unable to activate it till tomorrow cuz the Verizon activation server is down :( But I've waited this long so what's another few hours?! Anyway, my point is I will be taking some hopefully fabulous pics of my latest cards & posting them over the next couple days, so stay tuned!.......

P.S.  I don't know if anyone else out there likes Pit Bulls but I am obsessed with them! Anyway you can check out the new iPhone cover I bought HERE.  Get it? Hello Pittie instead of Hello Kitty? Ha ha ha! I crack myself up! This site is awesome for all kinds of things, you should check 'em out http://www.cafepress.com/